Sloping terrace: discover our expert solutions for preparing the ground
Introduction
When you’re planning to lay a terrace on sloping ground, adjustable pedestals are a practical and effective solution. These pedestals and their various accessories enable you to create a flat, stable surface for your terrace, without the need for complex levelling work. In this article, we’ll explain the 3 solutions available to help you prepare the ground for the creation of your future terrace on pedestals.
First of all, it’s essential to understand that a concrete slab for a terrace can never be perfectly flat. In fact, it’s strongly recommended that you add a slight slope to your slab to facilitate rainwater drainage under the terrace. A totally horizontal slab could lead to water stagnation and premature deterioration of the terrace structure.
According to the DTU (Document Technique Unifié) guidelines for terraces, a slope of 1% per meter is recommended. This corresponds to a slope of 1 cm per meter of terrace. So it’s perfectly normal for your concrete slab to have a slight slope ranging from 0 to 10 cm, or even more depending on the size of your composite or wood deck.
To compensate for this difference in height and install a wood deck on sloping ground, there are several solutions available.
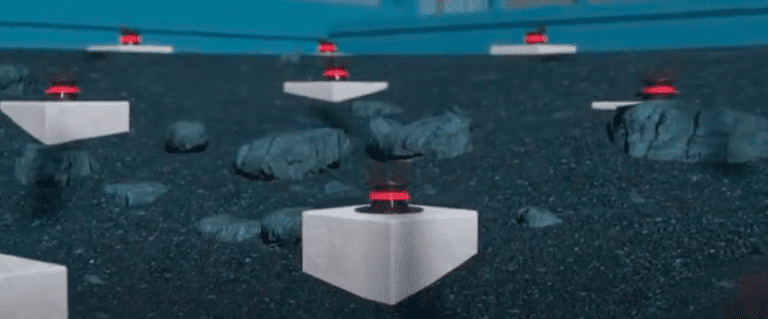
Solution n°1 : Use the self-leveling system
- Dig over 10 – 15cm and make the width of the field as flat as possible (approximative steps creation).
- Put a geotextile on the surface and preferably add crushed gravel on the top (it will make the ground more stable and sustainable in time). You can also use concrete tiles to put the pedestals on it if the land is not subject to excessive amounts of water filtration.
- Adapt the size of pedestals on each level difference’s sections (approximative steps).
- Place a self leveling disc on pedestals basis to make easier the final slop adaptation.
- Fix the flooring on steps lines, one after one and use a spirit level to make sure all sections are perfectly flat and leveled.
Solution n°2 : Use the extension accessory
- Remove as much soil as possible with an excavator and create 2 to 3 approximative big levels (big steps)
- Place geotextile and crushed gravel (or concrete tile on basis on pedestal)
- Catch up every “step” height thanks to the pedestals and extensions (max 4 extensions per pedestals) and continue to the top step.
Solution 3: Use concrete breezeblocks
If the height of your slope is greater than 230 mm and the use of pedestal is not possible, installing small concrete slabs under each pedestal, or concrete blocks for extra height, are effective tricks.
- Remove soil and create concrete structures with concrete cinder block on “L” shape on both sides of the terrace (left and right)
- Fill the center with the soil and make it flat as possible
- Place geotextile and gravels (or concrete basis)
- Place pedestals and flooring
In this situation (as represented in the picture), you need to anticipate the cladding/closure of the sides of the terrasse (to maintain soil).
The best solution will be taken regarding to soil quality, weather’s behavior , time and resources availability.
Conclusion
You now have an expert’s eye and a range of solutions for better understanding the installation of your future deck on adjustable pedestals on sloping ground. Take a look at our wood and slab installation guides for more technical information.